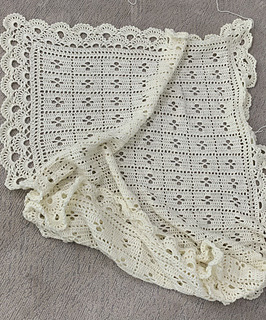
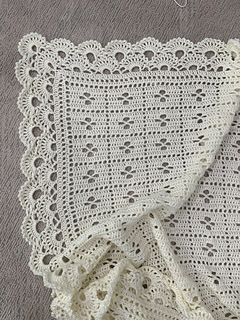
The Midwife Blanket
This is an amazingly popular free pattern & I can understand why. It is very simple to memorize after one or two repeats. Thanks to great instructions, it can be altered easily to increase or decrease its size. You can add just about any border to customize it as well. I have included the instructions for the border pattern I created below. I do not recommend paying for the main body pattern. There are some designers charging for the instructions. Take a minute & look for a free version if you are able. There really is no need to pay for this design.
Pattern: The Midwife Blanket by Rebecca Langford
Yarn: Hobby Lobby I Love This Yarn in Sport Weight (5.85 skeins / 1345.5 yards / 409g) in Ivory
Finished Size: 38" wide by 47" long
Hook: G (4.0mm)
Yarn Notes: This yarn was not my favorite & I struggled finding a pattern that I liked with it. It was either too lacy or too dense when changing hook size. This pattern was less than exceptional with the yarn. But I struggled through because I needed to do something with the yarn. I would not purchase this yarn again.
Pattern Notes: I started this blanket with a chain of 134. This made the body of the blanket about 31-32" wide. After 3 repeats of the pattern (row 19), my project weighed 55g & was 7 3/4" tall. Each repeat of the pattern was using about 16g of yarn & increasing the length by 2 1/2". After 8 repeats of the pattern (row 49), my project weighed 141g & was 19 1/2" long. After 15 repeats of the pattern (row 91), my project weighed 256g & measured about 31 1/2" wide by 38" long. At this point with about 170g of yarn left, I decided to begin the border. If you are struggling with the main body of this pattern, Joanna Martinez, has a great website with pictures & instructions. She also designed her blanket with a cute border you may want to try.
Border Notes: After looking at a few pattern books & other pictures on Pinterest, I made up the following border for this blanket. Please keep in mind that I am not a professional pattern writer & that I am sharing this for free. Please be kind in your comments & desire for help with the instructions. If you choose to share my border or instructions, I would appreciate that you reference & link my blog in your post. This border does take a considerable amount of yarn. I recommend making sure that you have plenty of yarn & if you are able measuring the weight of your yarn after each round so that you can make an educated decision in where to stop working. You are able to complete just the first section & end after Rnd 7. See pic below.
Border Instructions
Rnd1: hdc in each stitch
Rnd2: Dc, ch1 (In each corner complete Dc, ch1, dc, ch1, dc)
Rnd 3:Dc in every stitch (In each corner complete Dc, Dc, Ch1, Dc, Dc)
Rnd 4: In this round you will need a multiple of 3 ch6 loops plus 2. In each corner space work a sc, ch9, sc. From there ch6, skip 3 dc, sc. Keep repeating this until you get to the next corner. This is a good round to fudge a little if needed. Just make sure that when counting your ch6 loops you have a multiple of 3 plus 2. In my project I have 35 - ch6 loops across the top & bottom and 47 along the sides.
 |
| Round 5 |
Rnd 6: Once you slip stitch into the the ch3 from rnd5, ch 4 (this counts as 1st dc & ch1). (Dc into next Dc, ch1) 11 more times, Dc into next dc. *sc into next ch6 space. (Dc into next Dc, ch1) 8 times, Dc into next Dc.* Repeat from * to * until you reach the corner space. In the corner spaces repeat this same pattern except increasing the Dc, Ch1 to accommodate the extra DCs from the previous round. When you get to the end of Rnd 6, slip stitch into the 3 chain of the Ch4.
 |
| Round 7 |
Rnd 7: Slip stitch into first ch1 space. Sc into that same space, *ch3, sc into next ch1 space*. Repeat from * to * around entire round. End by slip stitching into the first sc. If you are running low on yarn or like the look of your border, this can be a great place to stop your border.
Rnd 8: Work slip stitches until you are in the next ch3 space. *Sc in ch3 space. Ch 6, skip next ch 3 space, sc into next (or that second) ch 3 space* repeat this one more time. Ch9, sc in same space. (This is now your corner space.) Ch6, skip next ch3 space, sc into next (or that second) ch3 space. Repeat the * to * one more time. #Ch6, skip the next three ch3 space. Repeat the * to * two times.# Now repeat from # to # until you get to the corner Ch3 spaces where you will Ch9 instead of Ch6.
Rnd 9: Same as Rnd 5
Rnd 10: Same as Rnd 6. On my blanket I now have 26g of yarn left.
Rnd 11: Same as Rnd 7. I ended with 10g of yarn left on my blanket.
You can continue this pattern adding as many rounds as you would like. I like the way the border looks when ending on a Rnd 7 repeat. But feel free to modify the pattern to your liking.


Comments
Post a Comment